Install ALB Controller
Overall
The AWS Load Balancer Controller is a Kubernetes controller that manages AWS Elastic Load Balancers (ELBs) for a Kubernetes cluster running on Amazon EKS or self-managed Kubernetes on AWS. It automates the creation and management of Application Load Balancers (ALBs) and Network Load Balancers (NLBs) to route traffic to Kubernetes services.
In this lab, we will use AWS Application Load Balancer (ALB).
Install eksctl tool.
- Open your terminal.
ssh ubuntu@18.206.88.146 -i ~/.ssh/labBastionHostSSHKey01.pem
- Change the
18.206.88.146to your EC2’s Public IP address. - Change the
~/.ssh/labBastionHostSSHKey01.pemto the path of the Key pair you downloaded when creating your EC2 instance. - After successful login to your EC2, switch to sudo user with
sudo su.
- Install eksctl.
Run this code block.
# for ARM systems, set ARCH to: `arm64`, `armv6` or `armv7`
ARCH=amd64
PLATFORM=$(uname -s)_$ARCH

curl -sLO "https://github.com/eksctl-io/eksctl/releases/latest/download/eksctl_$PLATFORM.tar.gz"

# (Optional) Verify checksum
curl -sL "https://github.com/eksctl-io/eksctl/releases/latest/download/eksctl_checksums.txt" | grep $PLATFORM | sha256sum --check

tar -xzf eksctl_$PLATFORM.tar.gz -C /tmp && rm eksctl_$PLATFORM.tar.gz

sudo mv /tmp/eksctl /usr/local/bin
Confirm the installation with
eksctl versionroot@ip-10-0-1-234:~# eksctl version 0.190.0
Install AWS Load Balancer Controller with Helm
- Create IAM Role using eksctl.
- Download this IAM policy for AWS Load Balancer Controller
curl -O https://raw.githubusercontent.com/kubernetes-sigs/aws-load-balancer-controller/v2.7.2/docs/install/iam_policy.json. - Create an IAM policy using the policy downloaded in the previous step.
aws iam create-policy \ --policy-name labAWSLoadBalancerControllerPolicy \ --policy-document file://iam_policy.json - Verify the IAM policy creation.
root@ip-10-0-1-234:~# aws iam create-policy \
  --policy-name labAWSLoadBalancerControllerPolicy \
  --policy-document file://iam_policy.json
{
    "Policy": {
        "PolicyName": "labAWSLoadBalancerControllerPolicy",
        "PolicyId": "ANPAQIJRSMTTDGFOSBY3W",
        "Arn": "arn:aws:iam::017820706022:policy/labAWSLoadBalancerControllerPolicy",
        "Path": "/",
        "DefaultVersionId": "v1",
        "AttachmentCount": 0,
        "PermissionsBoundaryUsageCount": 0,
        "IsAttachable": true,
        "CreateDate": "2024-09-21T06:26:23+00:00",
        "UpdateDate": "2024-09-21T06:26:23+00:00"
    }
}
- Create IAM Role using eksctl.
- Run this code block.
- Change
labEKSCluster01to your’s cluster name. - Change
017820706022to your account ID.
eksctl create iamserviceaccount \ --cluster=labEKSCluster01 \ --namespace=kube-system \ --name=aws-load-balancer-controller \ --role-name labAWSLoadBalancerControllerRole \ --attach-policy-arn=arn:aws:iam::017820706022:policy/labAWSLoadBalancerControllerPolicy \ --approve - Change
- Confirm that creation success.
root@ip-10-0-1-234:~# kubectl -n kube-system get serviceaccount | grep aws-load-balancer-controller
aws-load-balancer-controller                  0         81s
- Install AWS Load Balancer Controller.
- Add eks-charts Helm chart repository
helm repo add eks https://aws.github.io/eks-charts. - Update your local repo
helm repo update eks. - Install the AWS Load Balancer Controller.
- Change
labEKSCluster01to your’s cluster name. - Change
vpc-091882644e7c1e207to your’s VPC ID.
helm install aws-load-balancer-controller eks/aws-load-balancer-controller \ -n kube-system \ --set clusterName=labEKSCluster01 \ --set serviceAccount.create=false \ --set serviceAccount.name=aws-load-balancer-controller \ --set region=us-east-1 \ --set vpcId=vpc-091882644e7c1e207 - Change
- Verify that the controller is installed.
root@ip-10-0-1-234:~# helm install aws-load-balancer-controller eks/aws-load-balancer-controller \
  -n kube-system \
  --set clusterName=labEKSCluster01 \
  --set serviceAccount.create=false \
  --set serviceAccount.name=aws-load-balancer-controller \
  --set region=us-east-1 \
  --set vpcId=vpc-091882644e7c1e207
NAME: aws-load-balancer-controller
LAST DEPLOYED: Sat Sep 21 06:49:02 2024
NAMESPACE: kube-system
STATUS: deployed
REVISION: 1
TEST SUITE: None
NOTES:
AWS Load Balancer controller installed!
root@ip-10-0-1-234:~# kubectl get deployment -n kube-system aws-load-balancer-controller
NAME                           READY   UP-TO-DATE   AVAILABLE   AGE
aws-load-balancer-controller   2/2     2            2           58s
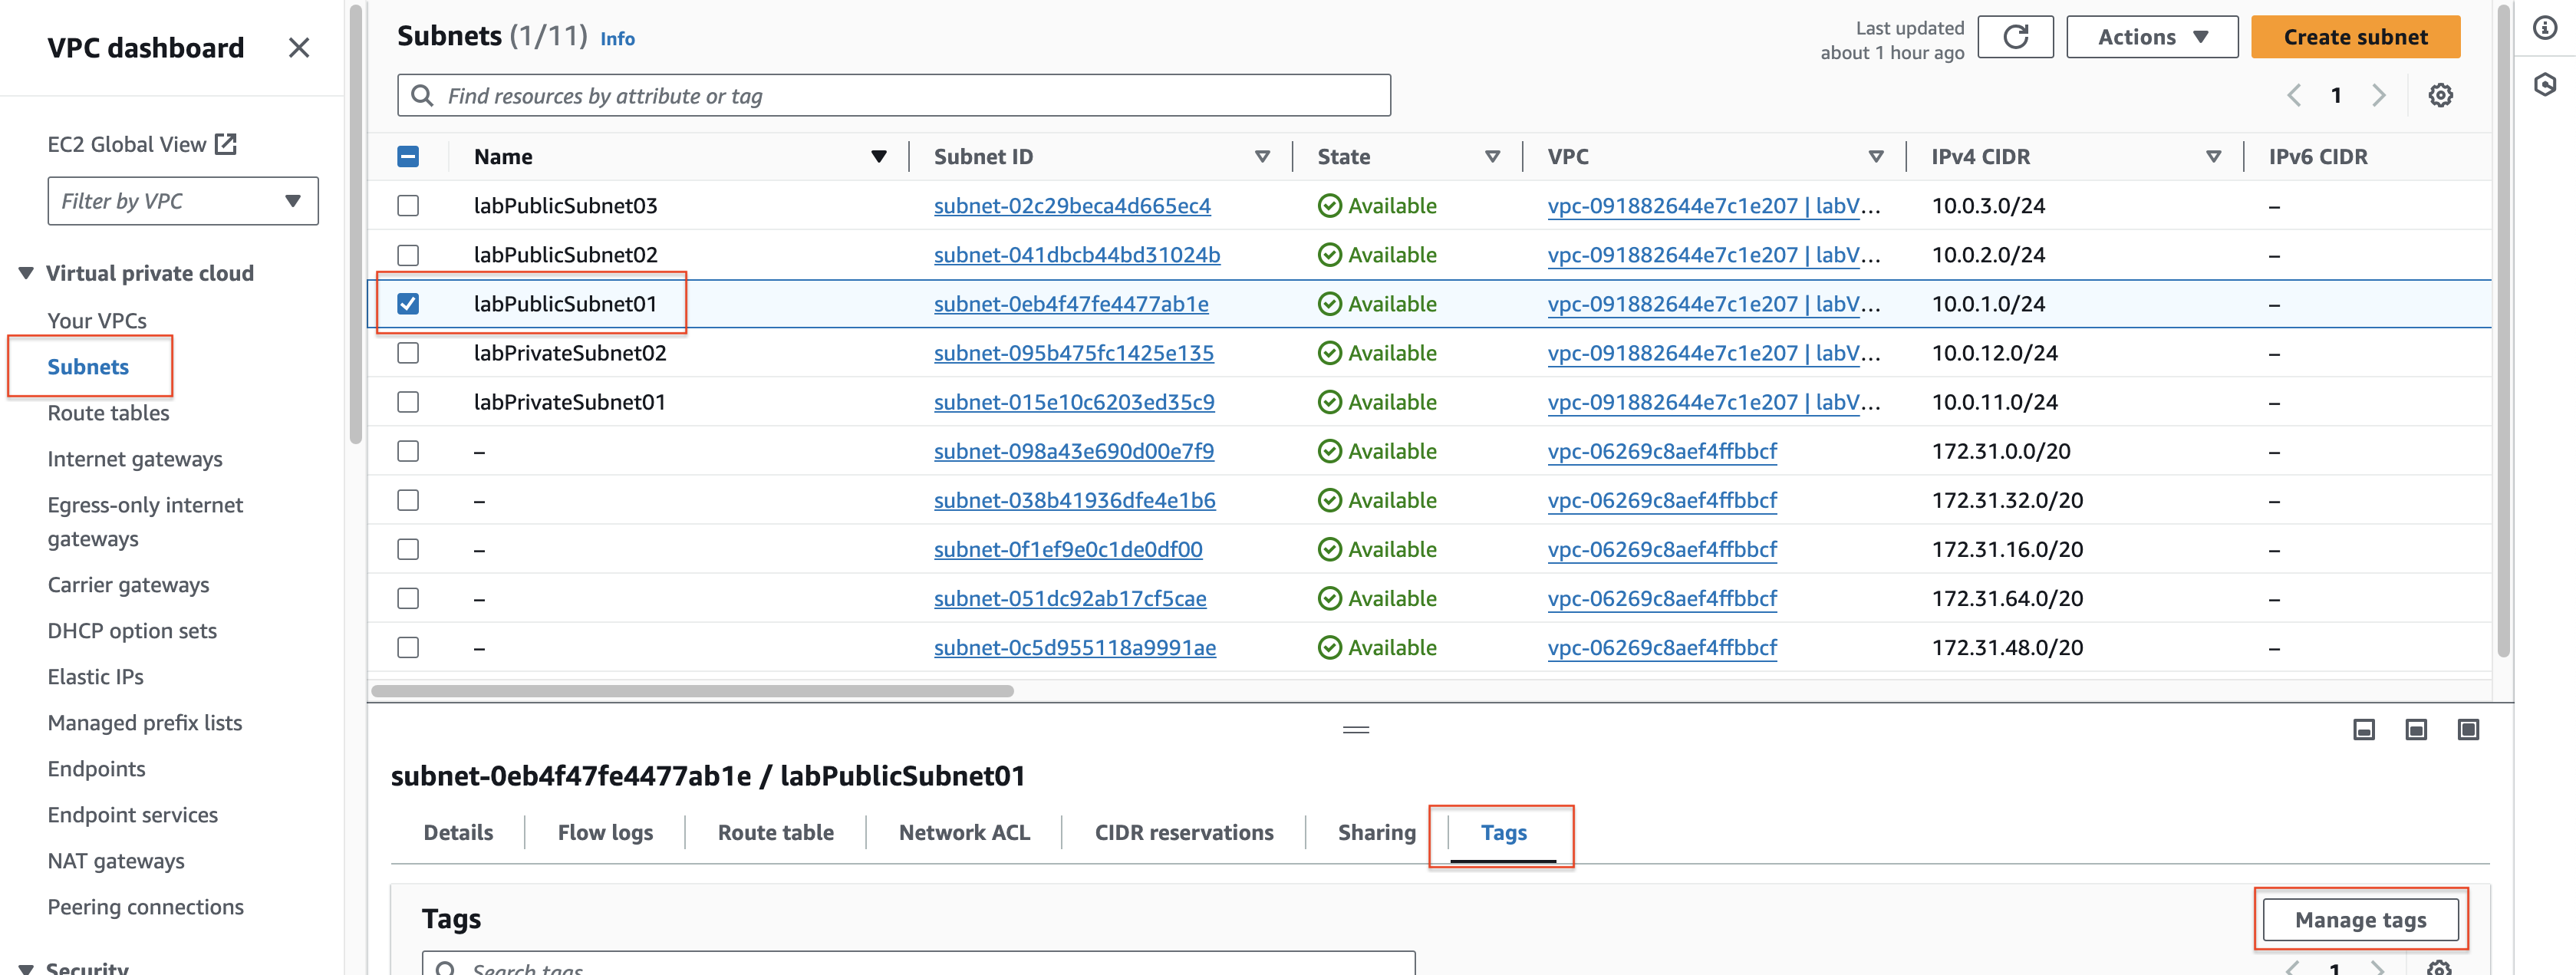
Add needed tags for Public subnet
- Click Subnets.
- Choose labPublicSubnet01.
- Click Tags.
- Click Manage tags.

- At Manage tags page.
- Click Add new tag.
- Enter kubernetes.io/role/elb key and 1 value.
- Click Save.
- Do the same with labPublicSubnet02.

Next, we will deploy Wordpress application.